
ContrastNest is reader-supported. When you buy through links on this page we may earn a commission, at no extra cost to you. Our guides are research-based and AI-assisted, and checked against sources; we don’t claim hands-on testing. Affiliate Disclosure →
The short answer: a traditional (stone-heater) sauna needs a planned fresh-air intake, an exhaust and a way to dry out after use, laid out the way your heater manual shows. A prefab infrared cabin usually has its ventilation built in; your job is to keep its openings and clearances clear and not add fans the manual doesn’t allow. Most home saunas don’t need a floor drain, but they do need a solid floor that doesn’t absorb water. Power and permits are local: a traditional heater means a licensed electrician and usually a permit.
How we researched this: This guide is research-based. We have not built, installed, vented, wired or tested any sauna, heater or vent mentioned. We compiled it from heater and cabin installation manuals, a contractor specification sheet, a sauna installer’s ventilation guide, a Finnish ventilation study as summarized by SaunaTimes, local permit pages, published cost guides and cited owner comments, all checked on November 1, 2026.
Not building, electrical or legal advice. Your heater or cabin manual, your local building and electrical code, your inspector (the authority having jurisdiction) and a licensed electrician have the final say. Where sources below disagree, we show the range and who said what; we don’t pick a winner.
Setup checklist at a glance
- Pick the sauna type first. Traditional and infrared have different ventilation, floor and power needs. Not sure? Read infrared vs traditional sauna.
- Download the installation manual before you buy. It sets vent positions, clearances, ceiling height and the circuit.
- Choose the location: indoor (basement, garage, bathroom-adjacent) or outdoor, with room for the manual’s clearances.
- Plan ventilation before walls close: intake, exhaust, drying and the door gap.
- Confirm the floor: solid, level, non-absorbent; no carpet.
- Call the building department and HOA, and tell your insurer.
- Book a licensed electrician before delivery day.
- Outdoors: level, well-drained pad sized for the weight.
- Add a thermometer-hygrometer at seated head height.

Ventilation: traditional vs infrared are different
Search results for “sauna ventilation” mix two very different products. A traditional sauna heats rocks and room air to high temperatures, people pour water for steam, and the room needs real air exchange. An infrared cabin heats you with panels at lower air temperatures and usually ships with its vents engineered in. Treat them separately.
Do you need ventilation in a traditional sauna?
Yes. Scandia’s heater installation guide warns that “improper ventilation is dangerous for the sauna user’s health” (Scandia install guide). Sauna & Steam Center, a Florida installer, puts it simply: the room needs “a deliberate path for fresh air, used air and post-session drying,” and should not be designed as a sealed box (Sauna & Steam Center, updated Sept 28, 2026).
Ventilation does three jobs: brings in fresh air for bathers, mixes heat so your feet aren’t cold while your head is hot, and dries the wood afterward. SaunaTimes, summarizing a 1992 Finnish study, says the inlet position recommended there also helps “keep the Carbon Dioxide levels low in the sauna” (SaunaTimes, engineer article).
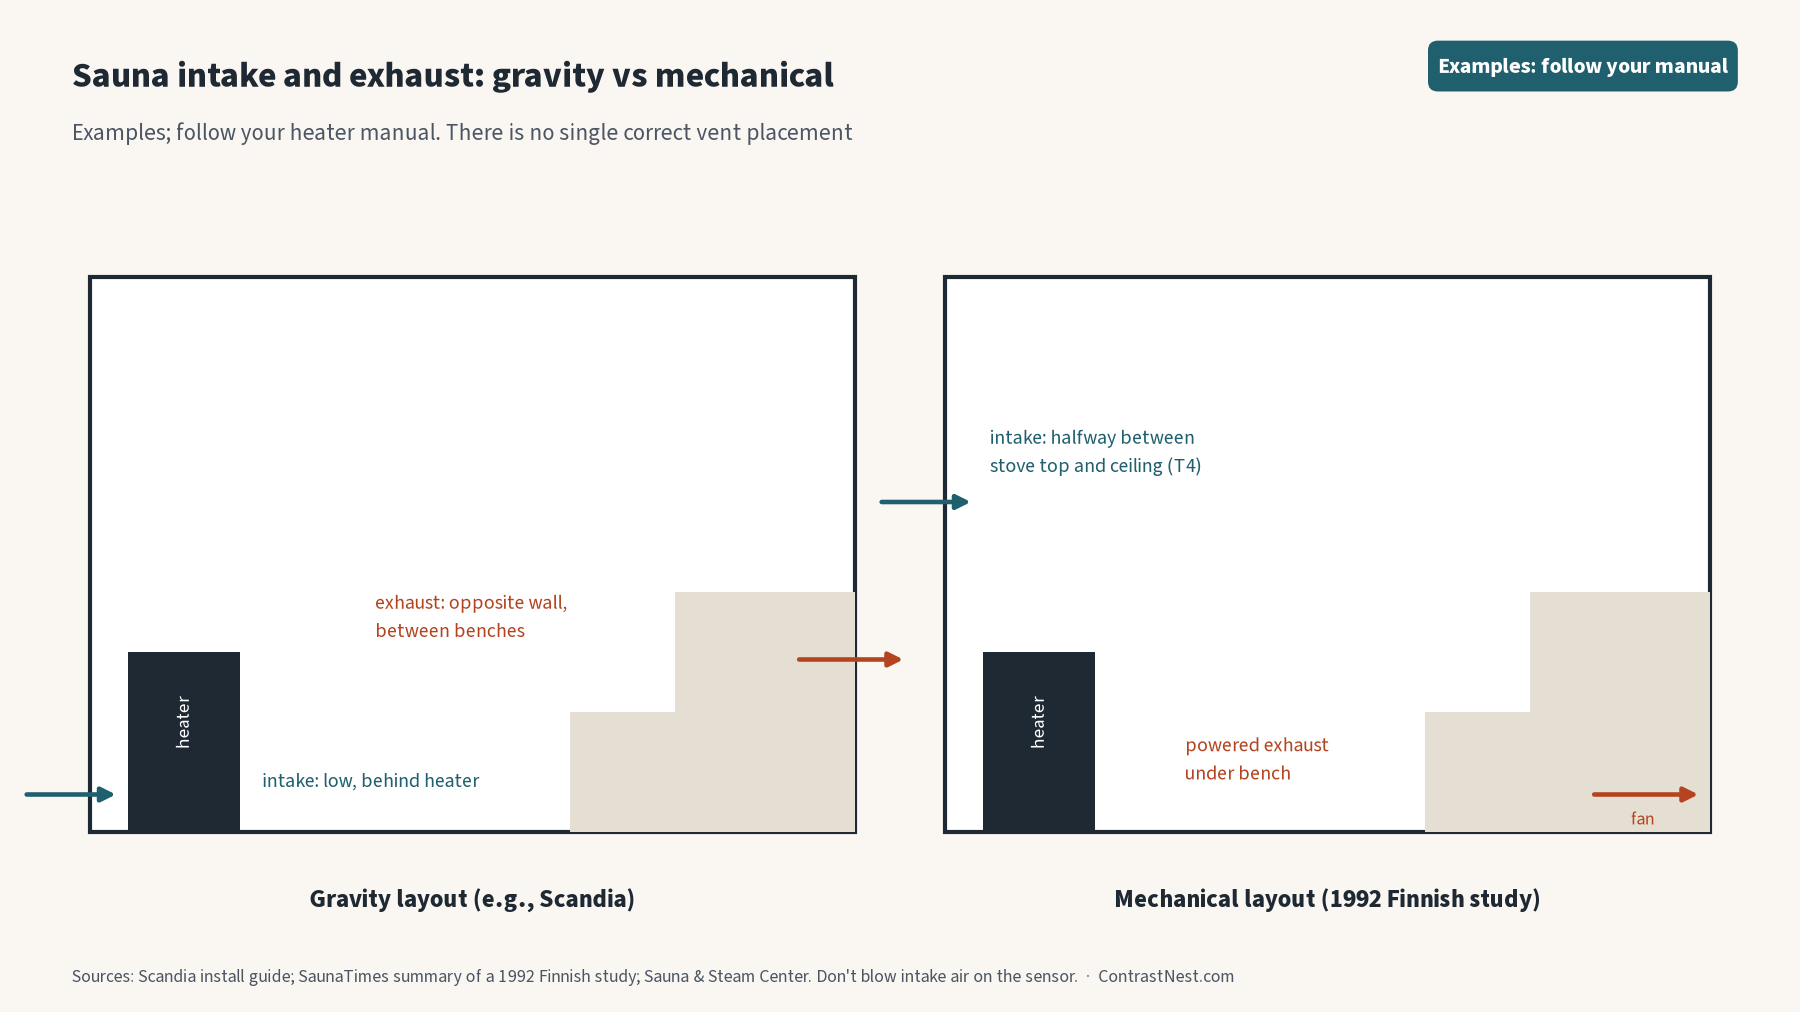
Where the intake and exhaust go (follow your heater manual)
This is where sources disagree most, mainly because they describe different systems. Here’s who says what:
| Source | Intake (fresh air) | Exhaust | System |
|---|---|---|---|
| Scandia install guide | Low, “immediately behind the heater as low as possible to the floor”; or below/near the base of the heater | Opposite wall, “as far away from the intake vent as possible,” ideally between upper and lower bench | Gravity (US heater) |
| 1992 Finnish study via SaunaTimes | “halfway between the Top of the Stove and the ceiling” (called T4) | Under the bench, far from the heater | Mechanical exhaust |
| Sauna & Steam Center | Gravity: below or beside the heater. Mechanical: near or above the heater | Mechanical: low, across from the heater, often under benches. Gravity: “manufacturer dependent” | Both |
Sources: Scandia; SaunaTimes, ventilation setup; SaunaTimes, engineer article; Sauna & Steam Center.
Why the US low-intake layout exists: owners on r/Sauna say older North American recommendations put the intake below the heater. One suggests it’s because US heaters max out at 190°F and “they want cool air”; another thinks CSA/UL may require a low intake but says both above and below work. These are owners’ guesses, not a manual spec (r/Sauna, “Ventilation location”). Sauna & Steam Center adds a warning: don’t let incoming air blow directly on the temperature sensor, or the controller may misread the room.
The bottom line on placement: use the diagram for your exact heater. Sauna & Steam Center says plainly that “there is no single sauna vent placement that is correct for every sauna.”
How much airflow? Air changes per hour
Figures vary by source, so we list them rather than choosing one:
- About 6 per hour: Tylo’s Sense UB manual says room air “should exchange approximately 6 times per hour” and that openings must meet UL 875 (Tylo Sense UB manual). Sauna & Steam Center says Harvia, HUUM and several Finnleo manuals use about six as well.
- 3 to 8 per hour: a SaunaTimes guest article cites Finnish regulations as requiring “3 to 8 volume changes per hour” (SaunaTimes, engineer article).
- 6 to 8 per hour: SaunaTimes says 6–8 is recommended in the US, and its author’s test sauna ran about 8 (SaunaTimes, ventilation setup).
To turn that into airflow, Sauna & Steam Center’s planning formula is CFM = room volume (cu ft) × air changes ÷ 60. Its example: a 5×7×7 ft room (245 cu ft) at six changes is about 24.5 CFM. It stresses that this “is not a fan-buying specification”; duct length, elbows and grilles change real airflow.
Vent sizes: also a range
- Scandia: exterior vents “should be adjustable with louvers,” and a typical standard size is a 4″×10″ floor vent.
- Finlandia (contractor spec): two 4″×10″ louvered vents, upper and lower wall (Finlandia).
- Tylo: a formula by room floor area. Under 31 sq ft, at least 9.3 sq in; above that, 0.3 × the area. Its 54 sq ft example needs 16.2 sq in, about a 4″×4″ opening, with inlet and exhaust equal in size.
These don’t conflict so much as reflect different heaters. Size to your manual.
Mechanical vs gravity ventilation
Gravity (passive) ventilation relies on convection and pressure differences, with no fan. Mechanical ventilation uses an exhaust fan for a predictable rate. Sauna & Steam Center says neither is automatically better: mechanical gives more control and suits tight homes, basements and long duct runs; gravity can work when the heater and building are designed for it. Don’t assume a bathroom fan belongs in a sauna; any fan, damper or duct must suit the heat and moisture.
Owners argue about this. In one r/Sauna thread, one commenter said passive venting doesn’t work with electric heaters and you need mechanical ventilation. A US sauna seller in the same thread said they’ve done “thousands of saunas with no venting,” a minority view (r/Sauna, “Ventilation placement advice”). That’s opinion, not a spec. None of the manuals we cite allow an unvented room, and Scandia calls improper ventilation “dangerous for the sauna user’s health.” Your manual and inspector decide.
Drying vent after sessions
Wet wood needs to dry. Some manufacturers show a separate higher vent that stays closed while heating and opens afterward, per Sauna & Steam Center. Tylo’s manual says to “air out the sauna often by keeping the door and vents open when the sauna is not in use.” If you dry the sauna into the house, the surrounding room has to handle that moisture too.
Air leaks and the door gap (manual figures)
Scandia specifies 3/4″ to 1″ between the finished floor and the bottom of the door. Sauna & Steam Center notes that a door gap is part of some designs and not others, citing one Harvia layout that needs at least 100 mm when exhaust goes to an adjacent washroom. SaunaTimes also advises sealing unplanned air leaks so air moves through the vents. Again: your manual’s figure wins.
Scandia and Tylo both require that the door opens outward and has no lock, only a magnetic or spring catch.
Do infrared saunas need ventilation?
Yes, but it’s usually built in. Tylo’s Kiruna infrared manual says: “ensure proper ventilation is provided and airflow is not restricted,” and “Ventilation must comply with instructions provided in this manual” (Tylo Kiruna manual). Sauna & Steam Center says Finnleo’s infrared manuals tell owners to keep ventilation openings free of obstruction.
What that means in practice:
- Keep the clearances. Kiruna’s floor panel goes 3–6 inches from nearby walls, within 5 feet of its dedicated receptacle. Sun Home asks for 4–6 inches around the Eclipse and 12–14 inches above the roof, in “a ventilated, climate-controlled space” (Sun Home Eclipse 2).
- Don’t add fans or cut vents unless the manual allows it; changes can affect temperature, sensors and the warranty.
- Don’t push the cabin against a wall if that blocks rear or top openings.
Full spectrum or far infrared doesn’t change this; see Full Spectrum vs Far Infrared Sauna: What the Wavelengths Actually Do.
Placement: indoor (basement, garage, bathroom) vs outdoor
Clearances, ceiling height, moisture
Ceiling height (traditional): Scandia recommends 7 ft (84″) and says ceilings over 8 ft void its heater warranty. Finlandia’s spec also says 7 ft, and no higher than 8 ft or “heat at bench levels will be ineffective.” Tylo’s manual adds that the ceiling above the heater shouldn’t exceed 194°F (90°C).
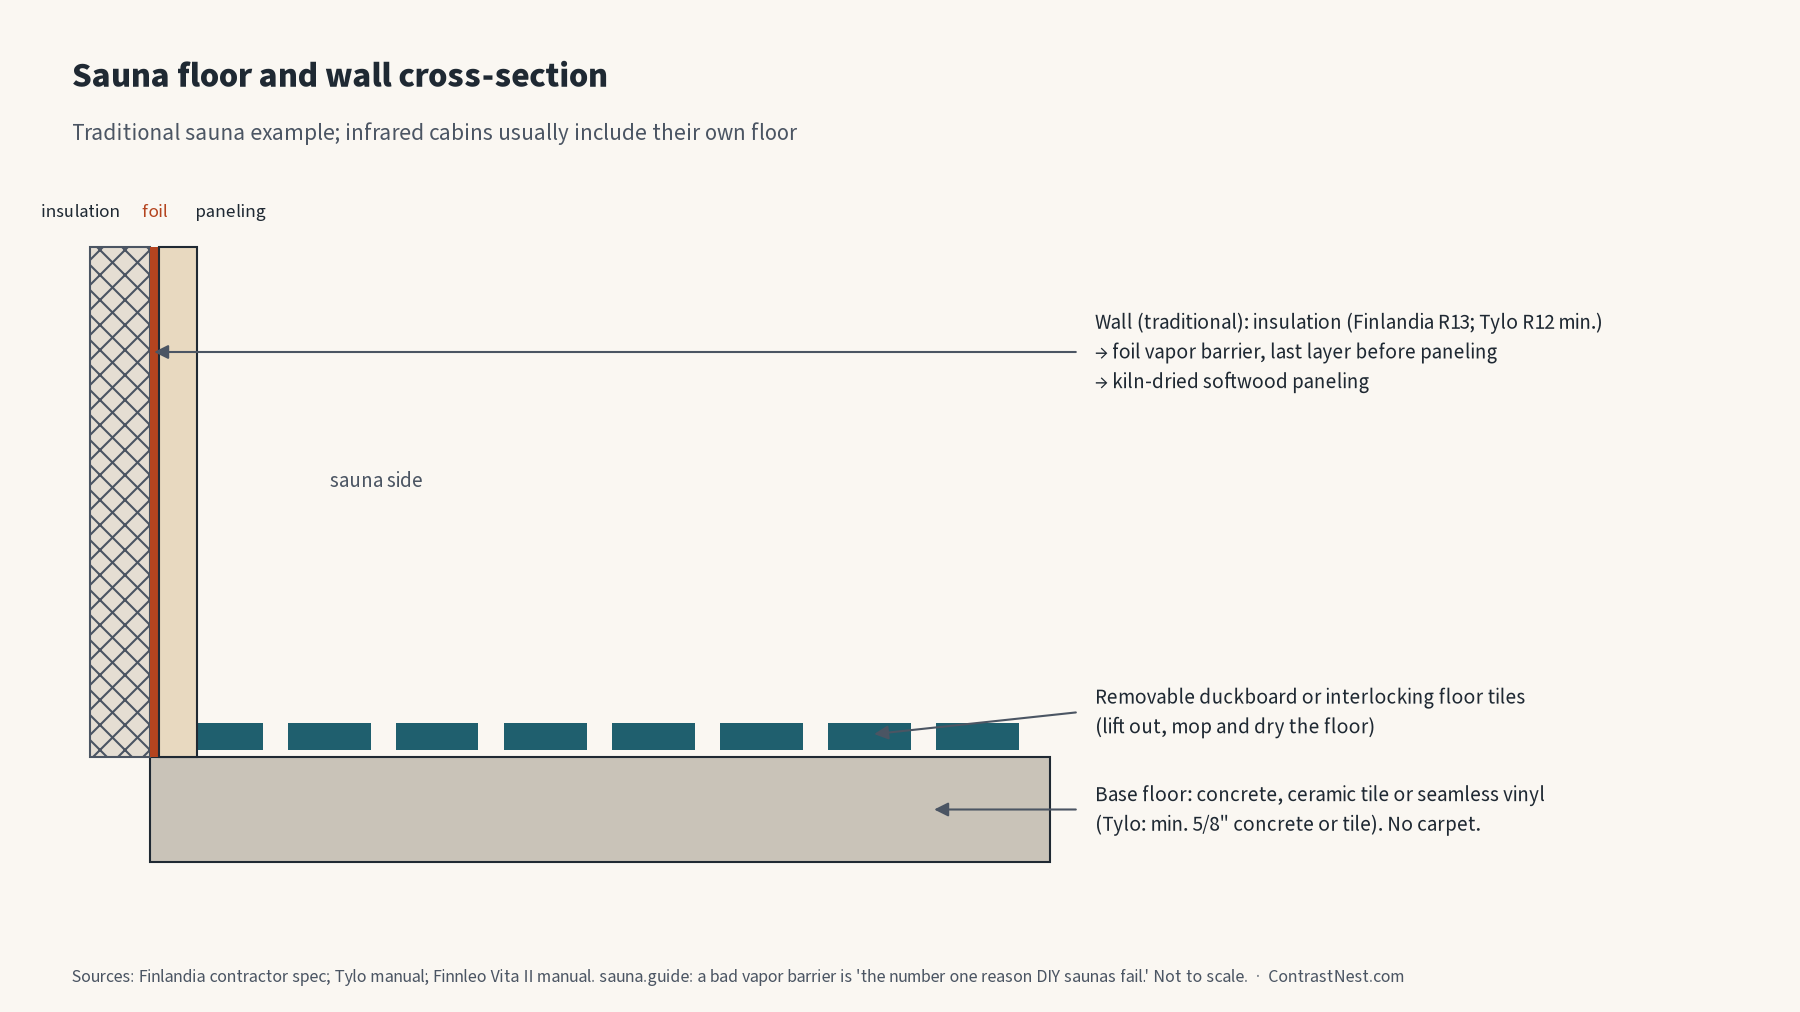
Wall materials (traditional): Scandia calls for kiln-dried softwood such as clear western red cedar and warns against ceramic tile or rock on the walls, which could overheat the heater. Never put the heater in a cove. Finlandia specifies R13 insulation with a foil vapor barrier as the last layer before paneling; Tylo lists R12 minimum plus foil.
Moisture: sauna.guide calls an improperly installed vapor barrier “the number one reason DIY saunas fail,” leading to hidden mold and rot (sauna.guide).
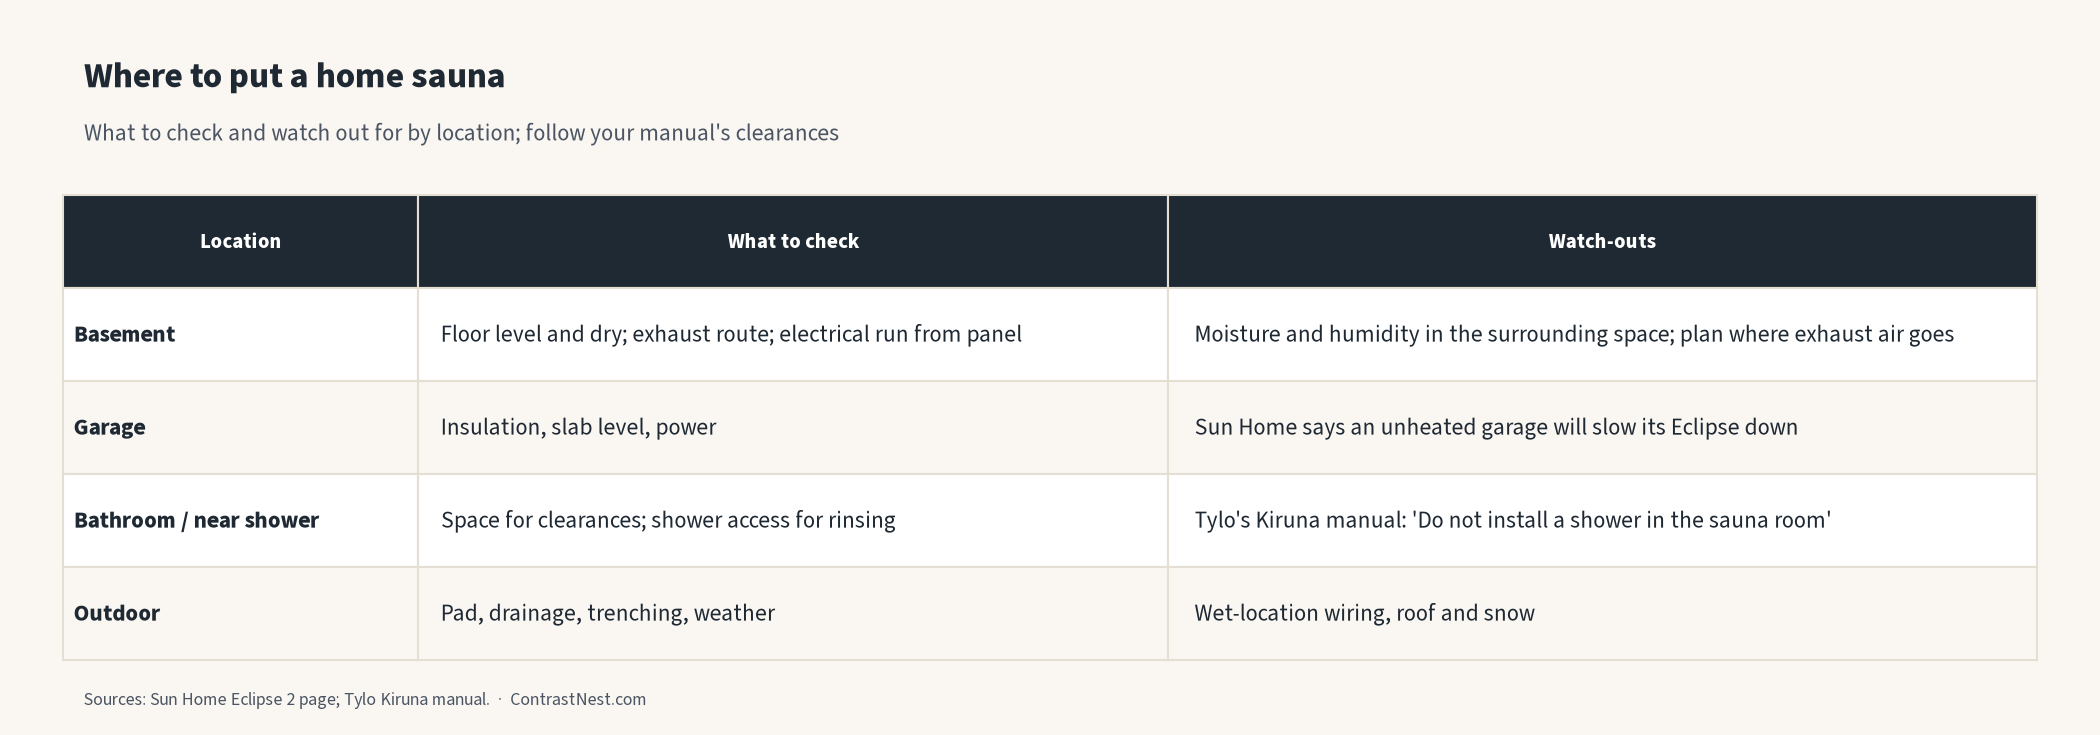
| Location | What to check | Watch-outs |
|---|---|---|
| Basement | Floor level and dry; exhaust route; electrical run from panel | Moisture and humidity in the surrounding space; plan where exhaust air goes |
| Garage | Insulation, slab level, power | Sun Home says an unheated garage will slow its Eclipse down |
| Bathroom / near shower | Space for clearances; shower access for rinsing | Tylo’s Kiruna manual: “Do not install a shower in the sauna room” |
| Outdoor | Pad, drainage, trenching, weather | Wet-location wiring, roof and snow; see outdoor section below |
Flooring and drains
Do saunas need a floor drain?
Usually not for a home sauna, but sources differ in emphasis:
- Finnleo (Vita II manual): “The short answer is no. A floor drain is not necessary in an indoor sauna but having one will facilitate cleaning,” because only small amounts of water go on the rocks (Finnleo Vita II manual).
- Finlandia: a floor drain “is recommended for new construction and is essential for commercial and public Saunas.”
- Infrared: no water is used, and Sun Home says never to splash or spray water in its cabins, so a drain generally isn’t needed.
If you plan to hose the room down, or the space already has a drain, it can help. If you add one, plan it with a plumber at the start, not cut in later.
Floor materials: tile/concrete vs wood duckboards
- Base floor: Finlandia specifies “hard surfaced, waterproof such as concrete, ceramic tile, or heavy-duty seamless vinyl.” Finnleo says concrete, tile, vinyl or any solid surface that doesn’t absorb water, and “Do not install the sauna directly on a carpet surface!” Over hardwood, it recommends a vinyl sheet under the base rails. Tylo lists a recommended minimum of 5/8″ concrete or tile.
- Walking surface: duckboards or removable tiles on top. Finlandia specifies removable interlocking plastic floor tiles; Tylo says the duckboard should be lifted out, the floor mopped and dried, and the boards scrubbed and dried before going back in.
- Infrared cabins usually include their own floor; Kiruna’s manual says to set it on a flat, level surface and, if necessary, use wooden shims beneath the floor panel to level it (Tylo Kiruna manual).
Power: the short version
We keep wiring detail in one place: sauna electrical requirements. The summary:
- Infrared cabins: many run on 120V, but on a dedicated circuit at 15, 20 or 30A depending on model. Tylo’s Kiruna needs 15 or 20A by model and rules out extension cords. Sun Home lists GFCI protection for its 120V circuits.
- Traditional heaters: the common 6 kW size is 240V, about 30A, hardwired.
- Cost: sauna.guide puts a new 240V circuit at about $600–$1,800, plus $1,500–$3,000 if the panel needs an upgrade.
No DIY wiring. Have a licensed electrician do it, pull the permit and follow the manual.
Permits, HOA and insurance
Requirements vary by jurisdiction. Two examples:
- Greater Salt Lake MSD requires a permit for “installing hot tubs, Jacuzzis, saunas, or spas” and for “adding, deleting, or altering any electrical circuits.” Its small-structure exemption applies only to structures without plumbing, mechanical or electrical work (Greater Salt Lake MSD).
- Kirkland, Washington lists “saunas built on site” among projects needing permits (City of Kirkland).
Finest Saunas estimates $100–$500 for permit and inspection (Finest Saunas). Finlandia notes some larger residences may need a fire sprinkler, so ask.
HOA: an outdoor sauna is a structure your HOA may need to approve; check before ordering. Insurance: tell your insurer about the installation and ask whether it changes coverage. We didn’t find a reliable general rule, so ask your own carrier.
Build vs buy: cost and effort
sauna.guide’s 2026 comparison (sauna.guide):
| Route | Cost (sauna.guide) | Time | Skill |
|---|---|---|---|
| DIY from scratch | $2,000–$8,000 materials | 40–100+ hours | Intermediate carpentry |
| Kit | $3,000–$15,000 | 15–40 hours | Basic handy skills |
| Pre-built | From about $1,899* | 1–8 hours | Minimal |
*sauna.guide’s own pre-built figures conflict, so this low end is the Dynamic Barcelona plug-in cabin’s listed price (Wellness Matrix USA); larger pre-builts cost far more.
The ranges overlap, so “cheaper to build” depends on your tools, skills and time. sauna.guide notes the sauna is often only 50–70% of the total, before electrical, permits, foundation and delivery; kits remove the biggest DIY risk because the vapor barrier is built into the panels. Electrical work is never part of the DIY savings: hire an electrician either way. Full budgets are in home sauna cost. Buying an infrared cabin? See Best Infrared Saunas for Home (2026): A Research-Based Buyer’s Guide.
Outdoor setup: foundation and pad
Outdoor saunas need a solid, level, well-drained base. Almost Heaven recommends concrete, pavers, decking or stone (Almost Heaven). sauna.guide estimates $200–$500 for a gravel pad and $1,000–$2,000 for a concrete slab. Ask your building department whether gravel is acceptable; the Provo example in our cost guide used one. Check the deck or pad can carry the weight: barrels and cabins in our comparison run about 900–1,150 lb.
Outdoor power often means a trench; Finest Saunas estimates $1,500–$5,000 for a trenched run. Barrel or cabin? See barrel vs cabin sauna.
Accessories: thermometer/hygrometer for the 200 rule
A thermometer-hygrometer tells you what you’re actually sitting in, since the controller’s sensor is often near the ceiling. Mount it at seated head height, away from the heater, door and vents. Readings feed the comfort rule of thumb explained in the 200 rule. Other useful items: a bucket and ladle for traditional saunas only, bench towels, and adjustable louvered vent covers if your manual calls for them.
Health note: Talk to your doctor before using a sauna or cold plunge, especially if you are pregnant or have a heart condition, low or high blood pressure, or another health condition. See our Health Disclaimer.
Heat safety: Harvard Health suggests no more than 15–20 minutes, cooling down gradually and drinking two to four glasses of water afterward, and says not to take a sauna when you’re ill (Harvard Health). Poison Control says pregnant women and children are generally advised to avoid saunas, and to avoid alcohol and medication patches in the sauna; leave if you feel dizzy, nauseated or have palpitations (Poison Control). Mayo Clinic advises talking to your doctor first if you have health concerns (Mayo Clinic). Poor ventilation can make a room stuffy; leave if you feel unwell.
FAQs
Do you need ventilation in a sauna?
Yes. Traditional saunas need a planned intake, exhaust and drying path; Scandia warns improper ventilation is dangerous. Infrared cabins usually have vents built in; keep them clear.
What ventilation is required for a sauna?
Whatever your heater manual specifies. Published air-change figures differ by source: about 6 per hour (Tylo, and Sauna & Steam Center citing Harvia, HUUM and Finnleo manuals); 3–8 (Finnish regulations, per a SaunaTimes guest article); and 6–8 (SaunaTimes’ US recommendation). Vents run from about 4″×4″ (Tylo’s formula example) to 4″×10″ (Scandia, Finlandia). Local code may add requirements.
Do infrared saunas need ventilation?
Yes, but it’s engineered into the cabin. Keep openings unblocked, keep the manual’s clearances, and don’t add fans unless the manual allows it.
Do saunas need a floor drain?
Usually not at home. Finnleo says a drain isn’t necessary indoors but eases cleaning; Finlandia recommends one in new construction. Infrared cabins don’t need one.
Is it cheaper to build your own sauna or buy one?
Often, in materials: sauna.guide puts DIY at $2,000–$8,000 versus $3,000–$15,000 for kits, but it takes 40–100+ hours and carpentry skill, and electrical, permits and foundation are extra either way. Some pre-builts cost less: the Dynamic Barcelona plug-in infrared cabin lists at about $1,899–$2,099 depending on the seller (Wellness Matrix USA; Dynamic Saunas Direct).
Do you need a 220 line for a sauna?
For a traditional electric heater, usually yes: 240V, often 30A, hardwired by an electrician. Many infrared cabins run on a dedicated 120V circuit. Details: Does a Sauna Need 240V? Sauna Electrical Requirements, Wiring and Electrician Cost.
What is the 200 rule for saunas?
A comfort rule of thumb for traditional saunas: °F plus relative humidity % ≈ 200. It’s not a safety limit and doesn’t apply to infrared. More in What Is the 200 Rule for Saunas? Temperature + Humidity Explained.
The bottom line
Start with the manual, not a diagram from the internet. Plan ventilation before the walls close, put the sauna on a solid non-absorbent floor, skip the drain unless you’ll hose it down, and book the electrician and permit early. Where sources disagree, your heater manual, local code and inspector decide.
Disclaimer: Educational information, not medical, building or electrical advice. Talk to your doctor before using a sauna, especially if you are pregnant, have a heart or blood-pressure condition, or take medication. Have a licensed electrician do all wiring, and follow your manual and local code. ContrastNest.com has not tested any product or layout here.